How to configure shared printer in windows 10
To add a shared printer in Windows 10, ensure both computers are on the same network, then go to Settings > Devices > Printers & scanners. Click “Add a printer or scanner,” and if the printer appears, select it and click “Add device.” If not, click “The printer that I want isn’t listed” to manually add it by name or IP.
Steps to Add a Shared Printer (Client Computer)
- Open Settings: Click the Start menu and select Settings (gear icon) > Devices > Printers & scanners.
- Add Device: Click on Add a printer or scanner.
- Locate Shared Printer:
- If the shared printer appears in the list, click it and select Add device.
- If the printer does not appear, click the link that says The printer that I want isn’t listed.
- Find by Name: In the pop-up window, select “Select a shared printer by name” and type the network path:
\\ComputerName\PrinterShareName. - Install Drivers: Follow the prompts to install the necessary drivers. If prompted, enter the username and password of the computer that is sharing the printer.
Alternative Method: Using IP Address
If the printer is on the network but not appearing:
- Go to Control Panel > Devices and Printers.
- Click Add a printer.
- Click “The printer that I want isn’t listed”.
- Choose Add a printer using a TCP/IP address or hostname and follow the prompts.
Troubleshooting
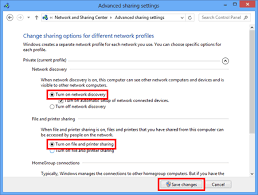
- Network Profile: Ensure your network is set to “Private” in Wi-Fi or Ethernet settings.
- Permissions: Make sure “File and printer sharing” is turned on in the Network and Sharing Center.
- Credentials: You may need the username and password of the primary computer.