How to configure ospf protocol in cisco switch
Configuring OSPF on a Cisco switch requires enabling routing, creating an OSPF process, defining the Router ID, and assigning interfaces to areas using wildcard masks. Key commands include ip routing (to enable L3), router ospf [process-id], network [address] [wildcard-mask] area [area-id], and show ip ospf neighbor for verification.
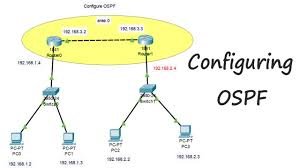
Basic OSPF Configuration Steps
- Enable Routing: Ensure the switch is acting as a router.
Switch> enable Switch# configure terminal Switch(config)# ip routing - Configure OSPF Process: Enter OSPF configuration mode.
Switch(config)# router ospf [process-id] Switch(config-router)# router-id - Define Networks/Interfaces: Specify which networks to advertise and their area.
Switch(config-router)# network [network-address] [wildcard-mask] area [area-id]Example:network 192.168.1.0 0.0.0.255 area 0
Alternative: Interface-Level Configuration
Instead of using network statements, you can enable OSPF directly on an interface.
Switch(config)# interface [interface-id]
Switch(config-if)# ip ospf [process-id] area [area-id]
Verification Commands
show ip ospf neighbor: Confirms neighbor adjacencies.show ip ospf interface: Displays OSPF-enabled interfaces.show ip route ospf: Shows routes learned via OSPF.show ip protocols: Validates OSPF process information.
Key Considerations
- Wildcard Masks: OSPF uses wildcard masks (inverse of subnet masks). For example, a
/24network () uses a
0.0.0.255wildcard mask. - Area 0: All non-backbone areas must connect to Area 0 (the backbone area).
- Router ID: It is best practice to manually define a unique
router-idfor stability. - Passive Interface: Use
passive-interface [interface]inside the OSPF config to prevent sending hello packets on interfaces that don’t have neighbors.